Why Your Foot Hurts When It Leaves the Ground: The Master Guide to Push-Off Pressure, Walking Mechanics, Diagnosis and Recovery
Meta title: Foot Pain During Push-Off: Walking Mechanics and Recovery Guide
Meta description: Learn where pressure should travel when your heel lifts, why foot or ankle pain may appear during toe-off, which walking errors can contribute, and how to rebuild safer gait mechanics.
Suggested URL: /foot-ankle-pain-during-push-off-walking-mechanics-guide/
Walking looks simple until one particular part of the step becomes painful.
Your foot reaches the ground normally. You can stand without much trouble. Your body moves forward. But when the leg trails behind and you begin lifting the foot for the next step, a sudden pain appears—sometimes deep inside the ankle, sometimes under the forefoot, and sometimes around the heel or big toe.
This moment is called push-off, toe-off, or the transition from terminal stance into pre-swing. It is one of the most mechanically demanding and frequently misunderstood parts of walking.
Many patients assume they must press harder through their toes to lift the leg. Others believe pressure should remain in the heel or middle of the foot. In reality, normal walking involves a smooth transfer of pressure, coordinated movement of the ankle, knee and hip, and progressive unloading of the trailing leg.
This guide explains what should happen, what can go wrong, what different pain patterns may mean, and how walking mechanics can be retrained safely.
Medical note: This article is educational and cannot diagnose the cause of an individual patient’s pain. Severe, recurrent or worsening pain should be evaluated by a qualified clinician.
1. The exact moment when push-off pain occurs
A complete walking cycle contains two broad phases:
- Stance: the foot is touching the ground.
- Swing: the foot is moving through the air toward the next step.
Stance begins when the heel contacts the ground and ends when the toes leave it. Terminal stance starts around heel rise, while pre-swing is the short period when both feet are touching the ground and the trailing foot is preparing to leave. (PubMed Central (PMC))
For the right leg, the sequence is approximately:
- Right heel contacts the ground.
- The rest of the right foot lowers.
- The body moves over the right foot.
- The right heel rises.
- The left foot contacts the ground.
- Body weight transfers toward the left leg.
- The right knee bends.
- The right forefoot and toes leave the ground.
- The right leg swings forward.
The calf and ankle plantar-flexor muscles contribute to supporting the body and moving it forward during late stance. Their action also helps initiate movement of the leg into the swing phase. (PubMed Central (PMC))
That is why pain during this brief transition can have several possible sources. The ankle is changing position, the calf is producing force, the forefoot is bending, tendons are gliding, and weight is simultaneously transferring to the other leg.
2. Where should pressure go when the heel lifts?
The most useful answer is:
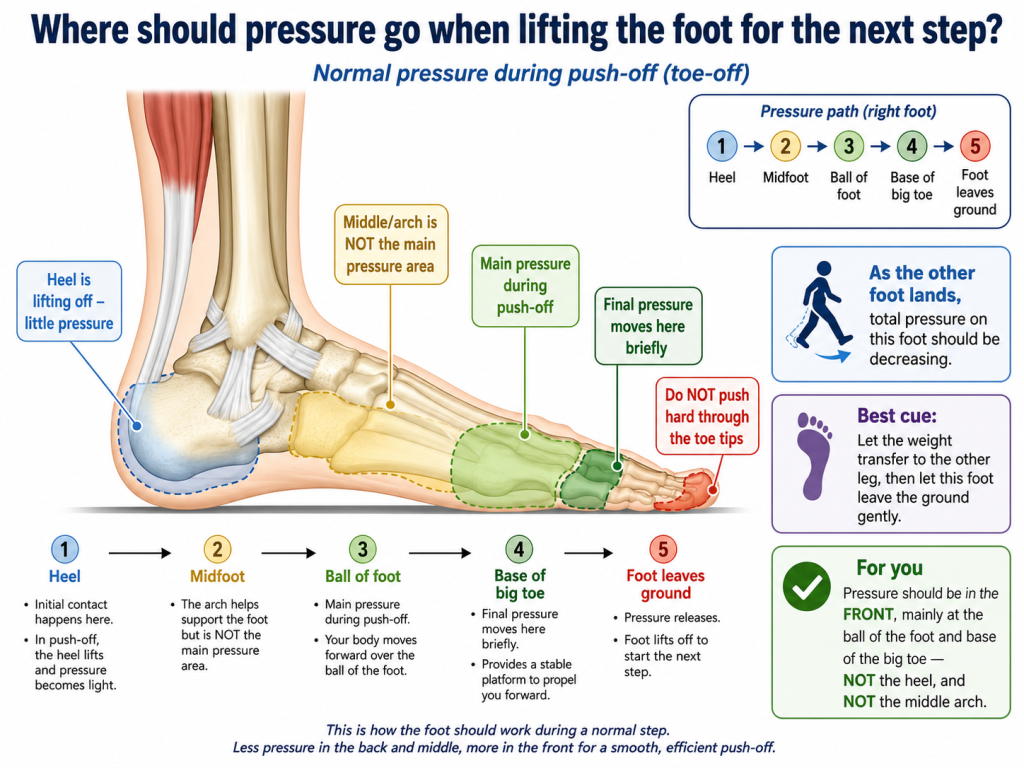
During normal push-off, the remaining contact pressure moves toward the forefoot—primarily the ball of the foot and then the medial forefoot or base of the big toe—while the total weight on that foot progressively decreases.
Pressure does not remain in one fixed location throughout the step.
| Walking phase | Main contact area | What should be happening |
|---|---|---|
| Initial contact | Heel | The foot begins accepting weight |
| Loading response | Heel toward midfoot | The entire foot begins supporting the body |
| Mid-stance | Midfoot and forefoot | The body moves over the planted foot |
| Terminal stance | Ball of the foot | The heel rises and the forefoot becomes the main contact |
| Pre-swing/toe-off | Medial forefoot and big-toe base | The other leg accepts weight and the trailing foot leaves the ground |
Plantar-pressure research shows substantial loading at the metatarsal heads during walking, while the center of pressure commonly advances toward the medial forefoot and hallux during late stance. However, the exact pressure distribution varies with anatomy, walking speed, sex, footwear, foot shape and existing deformity. (PubMed Central (PMC))
The three-zone answer
Back or heel:
By late push-off, the heel should already be off the ground. It should not remain the main pressure point.
Middle or arch:
The arch helps support and stiffen the foot, but it is not supposed to carry the final push-off pressure by itself.
Front of the foot:
The ball of the foot becomes the main contact area. The final pressure often shifts medially toward the first and second metatarsal region and the base of the big toe before the foot leaves the ground.
But there is an important warning:
Do not deliberately drive your entire body weight into the big toe.
The big toe is part of the final pressure path, not a button that must be pushed as hard as possible.
3. The biggest misconception: you do not lift the leg by crushing the toes into the floor
Normal push-off is not a single powerful downward press.
It is a coordinated transfer:
Other foot lands → weight transfers to the other leg → trailing heel rises → trailing knee bends → foot leaves the ground → hip carries the leg forward.
The final forefoot contact helps the body transition forward, but by this time the opposite limb has begun accepting weight. The trailing foot should therefore be progressively unloading rather than carrying maximum body weight. (PubMed Central (PMC))
A useful cue is:
“Transfer, bend and release.”
Not:
“Push harder through the toes.”
Trying to manufacture a forceful big-toe push-off may irritate an already painful forefoot, flexor tendon, Achilles tendon or posterior ankle structure.
4. Is a 60-degree trailing-leg position normal?
Patients often describe the leg as being “about 60 degrees behind” when pain occurs. However, that visual estimate usually combines movement at several joints:
- Hip extension
- Knee position
- Ankle dorsiflexion or plantar flexion
- Heel elevation
- Trunk position
It is not the same as measuring a 60-degree ankle angle.
Research demonstrates considerable variation in ankle motion between healthy individuals and across walking speeds. Reported peak plantar-flexion values during push-off vary widely, so a visual angle alone cannot determine whether someone is walking incorrectly. (PubMed Central (PMC))
What matters more is whether:
- The stride is excessively long.
- The foot remains loaded too far behind the body.
- Weight transfer to the opposite leg is delayed.
- The knee fails to bend smoothly.
- The foot twists during push-off.
- Pain repeatedly appears at the same point.
5. Walking errors that can overload push-off
5.1 Overstriding
Overstriding means placing each foot too far away from the body or allowing the trailing leg to extend excessively behind it.
A longer trailing position can demand more ankle motion and may keep the painful foot loaded for longer. Stride length, cadence and walking speed all influence lower-limb joint moments and ankle mechanics. Faster walking also increases Achilles-tendon loading. (PubMed Central (PMC))
A temporary reduction in step length may therefore help some patients, although it is not a universal treatment for every ankle condition.
5.2 Late weight transfer
The opposite foot lands, but the patient continues carrying excessive weight through the trailing foot.
This may happen because of:
- Fear of loading the other leg
- Hip or knee pain
- Poor balance
- Habit after an old injury
- Weakness in the opposite limb
- Reduced confidence while walking
The result can feel like trying to drag the body forward using the ankle.
5.3 Forceful toe pressing
Some people consciously claw the floor with their toes or press through the toe tips.
The final loading area should be closer to the ball and base of the big toe, not the tips of the toes. Persistent toe gripping may also be a compensation for poor balance or inadequate stability elsewhere.
5.4 Excessive toe-out or toe-in
Foot progression angle describes how far the foot points inward or outward during walking. Changing this angle affects plantar-pressure distribution and can alter mechanics at the ankle, knee and hip. Because the best angle varies between individuals, forcing both feet perfectly straight is not automatically correct. (PubMed Central (PMC))
5.5 Stiff ankle or tight calf
Limited ankle dorsiflexion can cause the heel to rise prematurely, the foot to turn outward, or the arch to collapse as the body tries to move forward.
Calf flexibility and ankle range-of-motion work are standard elements of foot and ankle conditioning, but aggressive stretching into sharp or deep pain should be avoided. (OrthoInfo)
5.6 Poor hip or knee control
Walking is a whole-leg activity. Hip rotation, pelvic control and knee alignment influence the direction in which force reaches the foot.
A previous injury higher in the limb may create an asymmetric strategy, but it should not automatically be blamed for new ankle pain. Proper gait analysis evaluates the hip, knee, ankle and foot together. (PubMed Central (PMC))
6. Pain location provides clues—but not a diagnosis
Deep pain at the back of the ankle
Pain that becomes worse when the ankle points downward or during repetitive push-off may be associated with posterior ankle impingement.
This occurs when bone or soft tissue at the back of the ankle becomes compressed during plantar flexion. Possible contributing structures include the posterior talar process, an os trigonum, inflamed joint tissue and the flexor hallucis longus tendon. (PubMed Central (PMC))
Deep posteromedial pain or pain connected to big-toe movement
The flexor hallucis longus, or FHL, runs behind the ankle and helps flex the big toe. Repetitive push-off or plantar flexion may irritate the tendon or its sheath. (PubMed Central (PMC))
Pain along the Achilles tendon or back of the heel
Achilles tendinopathy commonly causes pain along the back of the lower leg or near the heel. Walking, running, calf loading and sudden increases in activity may aggravate symptoms. (OrthoInfo)
Pain under the ball of the foot near the big toe
Pain directly beneath the big-toe joint may involve the sesamoid bones or surrounding tendons. Sesamoiditis commonly produces pain at the ball of the foot under the base of the big toe and may make bending the toe uncomfortable. (OrthoInfo)
Heel pain during the first steps after rest
Plantar fasciitis most often causes pain near the bottom of the heel, especially during the first few steps after getting out of bed or after prolonged sitting. This is different from pain that appears only at toe-off. (OrthoInfo)
Deep joint pain with catching or locking
Pain that feels as though something catches inside the ankle may suggest an intra-articular problem, such as cartilage injury, synovitis or an osteochondral lesion. Joint catching or locking deserves clinical assessment rather than repeated forced exercise. (OrthoInfo)
Burning, tingling or reduced sensation
Burning, numbness, tingling or reduced awareness of pressure may indicate nerve involvement. In people with diabetes, nerve damage can reduce protective sensation, while altered plantar pressure can increase the risk of unnoticed skin injury. (CDC)
7. How to analyse your walking mechanics safely
A home video cannot diagnose an ankle condition, but it can reveal patterns worth discussing with a physiotherapist.
Record several steps:
- From the right side
- From the left side
- From behind
- Walking toward the camera
- In normal shoes and, if safe, briefly barefoot
Look for asymmetry rather than perfection.
Questions to examine include:
- Does one foot point outward more?
- Does the painful leg travel farther behind the body?
- Does the heel rise much earlier or later on one side?
- Does the knee remain unusually straight during toe-off?
- Does the pelvis drop?
- Is one step longer than the other?
- Does the foot roll dramatically inward or outward?
- Do you hesitate before transferring weight to the opposite leg?
- Do your shoes show very different wear patterns?
A professional assessment may add slow-motion analysis, pressure measurement, joint-range testing, strength testing and observation of the entire lower limb. Gait analysis is commonly used to describe abnormalities and guide treatment in foot and ankle disorders. (PubMed Central (PMC))
8. The push-off mechanics reset
The safest initial goal is not to create a stronger push.
The goal is to create a smoother and less painful transition.
Step 1: Shorten the stride slightly
Reduce your normal step length by approximately 10% rather than taking tiny artificial steps.
This keeps the painful leg from travelling excessively far behind the body and may reduce the demand placed on the ankle during late stance. Because stride changes redistribute loads throughout the limb, they should be treated as a temporary experiment rather than a permanent universal correction. (PubMed Central (PMC))
Step 2: Let the opposite foot land earlier
For a painful right push-off:
- Let the left heel contact the ground.
- Begin transferring your body weight onto the left leg.
- Allow the right heel to rise.
- Let the right knee bend.
- Release the right forefoot gently.
- Bring the right leg forward from the hip.
This prevents the right ankle from trying to perform the entire transition alone.
Step 3: Use a quiet foot
Try to reduce:
- Loud heel strikes
- Toe slapping
- Toe clawing
- Twisting on the planted foot
- Aggressive pushing through the big toe
A smooth step should feel more like rolling and releasing than stamping and launching.
Step 4: Keep the knee soft
The knee should begin bending as the foot prepares to leave the ground.
Keeping the trailing knee rigid can delay unloading and make the ankle work harder to bring the leg forward.
Step 5: Avoid forcing the foot perfectly straight
Allow the foot to follow its comfortable natural angle unless a clinician has identified a specific rotation problem.
Changing foot progression angle can redistribute pressure elsewhere, and the optimal adjustment is individual rather than identical for everyone. (PubMed Central (PMC))
9. A conservative four-stage rehabilitation framework
This is a general educational framework, not a diagnosis-specific prescription.
Stage 1: Calm the painful movement
For one to two weeks:
- Reduce walks that reliably provoke severe pain.
- Use shorter, more frequent walks instead of one long walk.
- Avoid running, jumping and forceful hill climbing.
- Avoid repeatedly testing the painful push-off.
- Wear stable, well-fitting shoes.
- Stop walking when sharp pain changes your gait.
Complete rest is not always necessary, but repeatedly walking through severe pain can reinforce compensation and make it harder to identify the original mechanism.
Stage 2: Restore pain-free movement
Gentle options may include:
Ankle range of motion
While seated, slowly move the ankle up, down and in small circles.
Do not force the ankle into the precise angle that produces deep pain.
Straight-knee calf stretch
Keep the heel down and the knee straight while leaning toward a wall.
Bent-knee calf stretch
Bend the rear knee slightly while keeping the heel down. This places greater emphasis on the soleus muscle.
The AAOS conditioning program includes ankle range-of-motion exercises and both straight- and bent-knee calf stretching as general foot and ankle conditioning methods. (OrthoInfo)
Stage 3: Rebuild control
When normal standing and basic movement are comfortable, exercises may include:
- Supported single-leg balance
- Short-foot or arch-control exercise
- Toe spreading and gentle toe control
- Glute bridges
- Side-lying hip abduction
- Controlled sit-to-stand
- Low step-ups
These exercises target the foot, balance system, hip and knee instead of treating the ankle as an isolated hinge.
Stage 4: Rebuild push-off capacity
Only when the painful motion is settling:
- Begin with seated heel raises.
- Progress to two-leg standing heel raises.
- Slowly shift slightly more weight toward the recovering side.
- Progress to single-leg loading only when clearly tolerated.
- Add longer walking and hills gradually.
Calf raises and resisted ankle movements are included in standard conditioning programs, but the correct starting level depends on the diagnosis and symptom irritability. (OrthoInfo)
The pain rule
Stop an exercise when it produces:
- Sharp or catching pain
- A sudden feeling of collapse
- Increasing instability
- Pain that changes your walking
- Swelling or significant pain that persists afterward
Muscle effort and mild fatigue are different from reproducing the patient’s severe, familiar pain.
10. Footwear: support the transition, do not fight the foot
Shoes cannot correct every biomechanical problem, but poorly fitting or worn-out footwear can make pressure distribution less comfortable.
Look for:
- Adequate width around the toes
- A secure heel counter
- A stable but comfortable sole
- Cushioning that is not completely compressed
- Enough room for the big toe to remain straight
- Similar wear beneath both shoes
A shoe that is extremely flexible may demand more motion from the painful forefoot, while an excessively rigid or narrow shoe may increase focal pressure. The correct balance depends on the pain location and diagnosis.
Orthotics can help redistribute pressure in selected patients, but they should not be purchased solely because an internet diagram shows a particular pressure path. A poorly chosen insert can simply move the pressure from one painful region to another.
11. When imaging may be appropriate
Imaging should answer a clinical question; it should not replace examination.
For chronic ankle pain, the American College of Radiology generally considers ankle radiographs an appropriate initial imaging test. Depending on the examination and X-ray findings, MRI, CT or ultrasound may then be used to evaluate suspected cartilage, tendon, ligament, impingement or other soft-tissue abnormalities. (ACR Search)
A clinician may consider further imaging when there is:
- Recurrent deep pain over several weeks or months
- Mechanical catching or locking
- Significant swelling
- Unexplained weakness
- Persistent pain despite appropriate rehabilitation
- Concern for tendon, cartilage or ligament damage
- Possible stress injury
- Symptoms that do not match a simple strain
MRI does not automatically mean surgery. It may simply help identify which tissue should—or should not—be loaded during rehabilitation.
12. When to seek medical care promptly
Arrange an assessment sooner rather than attempting to retrain your gait alone when:
- Pain is severe enough to stop you walking.
- The ankle repeatedly gives way.
- You cannot bear weight normally.
- There is significant swelling, bruising or deformity.
- The joint catches or locks.
- Pain occurs at rest or wakes you at night.
- There is numbness, burning or progressive weakness.
- The foot becomes unusually hot, cold, red, pale or blue.
- A wound, blister or ulcer appears.
- Symptoms began after a fall or twisting injury.
- Pain continues despite reducing the aggravating activity.
People with diabetes should inspect their feet every day for wounds, redness, swelling, blisters, calluses and skin changes. Diabetes can affect sensation and blood flow, so foot problems may require earlier medical attention even when they initially appear minor. (CDC)
13. What to tell the doctor or physiotherapist
Instead of saying only, “My ankle hurts,” describe the movement precisely:
“My foot accepts weight normally, and standing is comfortable. The pain occurs when the affected leg is behind me, the heel rises and I begin lifting the foot for the next step. It feels deep and can become severe enough to interrupt walking.”
Also report:
- Exact pain location
- Whether pointing the foot downward hurts
- Whether moving the big toe reproduces pain
- Whether heel raises cause symptoms
- Whether the joint catches
- Walking distance before symptoms begin
- Effect of hills, stairs and speed
- Any previous ankle, knee or hip injury
- Diabetes or reduced foot sensation
- Shoe-wear differences
This directs the examination toward the actual painful phase rather than a generic ankle assessment.
14. Frequently asked questions
Should pressure be in the front, middle or back when the foot lifts?
At late push-off, the heel is already lifting, so the remaining contact is mainly in the front, especially the ball of the foot. Final contact commonly progresses toward the medial forefoot and base of the big toe before release.
The total pressure on the trailing foot should nevertheless be decreasing as weight transfers to the opposite leg.
Should I push hard through the big toe?
No. Allow pressure to pass through the big-toe base naturally, but do not forcefully drive your body forward through one toe.
Is the arch supposed to push the body forward?
The arch contributes to support and foot stiffness, but it is not the final isolated pressure point during toe-off.
Can incorrect walking cause ankle pain?
Walking mechanics can contribute by repeatedly overloading a structure. However, pain can also change the way a person walks. In many cases, gait abnormality is partly a cause and partly a response.
Can an old knee injury affect the ankle?
It can alter stride length, rotation, weight transfer or confidence on one side. However, a new ankle condition should still be evaluated directly rather than automatically attributed to the knee.
Will gait correction alone fix the pain?
It may help when mechanics are a major contributor, but it will not remove an osteochondral lesion, significant tendon injury, stress fracture or mechanical impingement. Persistent severe pain requires diagnosis.
Should I keep walking through the pain to strengthen the ankle?
Do not continue through severe, sharp or gait-altering pain. Use activity levels that allow you to walk without limping or compensating.
Final takeaway
A healthy push-off is not created by pressing harder through the toes.
It is created by a well-timed sequence:
The opposite foot lands. Weight begins transferring. The trailing heel rises. The knee bends. Pressure passes briefly through the forefoot and big-toe base. The foot then releases gently into swing.
At the instant the foot leaves the ground:
- Pressure should not remain in the heel.
- The middle arch should not be the main final pressure point.
- The toe tips should not be aggressively driven into the floor.
- The ball of the foot and medial forefoot form the final contact pathway.
- The overall weight on that foot should already be decreasing.
When severe pain repeatedly occurs during this exact phase, do not assume that you merely need to “walk correctly.” Walking mechanics may be contributing, but the pain can also reflect posterior ankle impingement, tendon irritation, Achilles pathology, forefoot overload, cartilage injury or another condition requiring focused examination.
The best recovery plan combines accurate diagnosis, sensible load reduction, whole-leg rehabilitation and carefully supervised gait retraining—not forced push-off and not endless guessing.